I drilled the new floor panel in preparation for welding. These holes will get filled using a 'plug welding' technique that gives similar results to the factory spot welding, so I used the same number and spacing as the original spot welds. For the record, it needed 162 holes.
Tuesday, December 17, 2019
Monday, November 18, 2019
New floor panel fitting
The new BMH left-side floor arrived today. I was surprised and pleased
with the fast shipping from Moss UK. Ordered Friday and arrived Monday
morning for shipping cost of only 33£, despite the oversized fee.
I believe Moss Europe, https://www.moss-europe.co.uk/,
is going to be my go-to vendor for many parts in the future. The prices
on a lot of things are lower and the shipping doesn't take any longer
than buying from a US based vendor. For example, buying this floor from
Moss UK saved me $120 over buying from Moss US. The total cost came to
$167, versus $287 for the same part (including shipping) if I had
ordered from Moss US.
Anyway, about the new floor. It's an excellent copy of the original and
fits perfectly. Only difference I see in the design is that there are
three additional holes that the later cars have, which get filled with
plastic plugs.
Sunday, November 17, 2019
Sill inspection
Got the old tar undercoat cleaned off from the passenger side sill area and inside the fender arches. Most of it was knocked off using a pneumatic needle scaler. Then the residue was cleaned with mineral spirit and a SS pot scrubber.
Since the sills are a typical problem for rust on MGBs, I was relieved to see that there was none here.
Wednesday, November 13, 2019
Floor panels
Starting with the driver's side, the carpeting was completely rotten, so
when I removed it it just came out in shreds and crumbles. Then I saw
that the floor was stangely distorted. At first it looked like it was
bent up. But then I realized that it was just a very thick layer of tar
that had been distorted by the driver's heals resting in the same spots.
All the flooring tar was removed using a heat gun and small trowl tool.
Then I went over the rusty areas with a needle scaler, which reveled
the full extent of the rust. Where the tar had compressed under the
drivers heels, it had formed a bowl shape that evidently served to
collect a puddle of water, as that's where the worst floor rust is.
Interesting thing about this rust spot -- it can't be seen from under
the car because it's over the frame rail boxed section.
There's more rust at various other locations. The rear of the floor isn't terrible and could be patched, but I'm just going to replace it entirely. The forward lower edge of the tunnel will need patching as well.
On the passenger side floor I got a lucky break -- no rust repairs needed.
A view into the underworld.
Thursday, November 7, 2019
Rear wing repair panels
The original factory seam where these panels joined was a butt-weld that was then filled with lead. So identifying the precise cut location was a bit tricky. I ended up cutting a bit short and had to weld up a gap.
All the rear panel welding is done. Now I have to work on the tailgate shut
line. I think the bolt holes in the hinges will need to be enlarged to
allow some adjustment. That and posibly some shims.
Friday, November 1, 2019
Welding rear panels
Today's job was to weld in the back panel/valence assembly. This ties into several body panels and frame members, so getting them all to cooperate took a lot of adjustments, pulling stretching, bumping and squeezing. And then the rear hatch has to close with a good panel gap line. After I settled on the alignment that I wanted, using clamps to hold it together, the outlines of the weld flanges from the various body parts are scribed onto the backside. Then I could remove it to see where to strip the primer and drill the spot weld holes.
Welding done, and rough grinding of the bumps completed.
After further dressing down of the welds it gets sanded to see what's left to do. Almost there.
These joints were smoothed with lead filler at the factory. Later rubber
bumper MGBs didn't bother to smooth this joint because it was hidden
behind the rubber bumper.
There are weld ripples due to the heavy clamping force I had to use to get the flanges into position for welding. Most of this will be hidden behind the bumper, but I'll still need to use a little filler here and there.
Sunday, October 27, 2019
Details
There are always a lot of little things that need to get done before you can go on to the big things.
This tail light mounting panel had a section cut out for some reason. So
I patched it in with new metal. Traced the pattern from the other side
of car.
The muffler hanger mounting bracket at the rear of the boot floor had been torn off, leaving cracks and bits of the old bracket behind. The owner just drilled a hole in the floor and attached to that instead. After repairs to the boot floor a new bracket was made and welded in.
Making up new bottom 'fillers' for the area under the tailfin points. Old pieces used as patterns.
Oh no! I made two left-handed pieces! That caused me to do a double-take for a moment.
Test fitting. When this gets welded in the parts need to be assembled in a specific sequence.
Thursday, October 24, 2019
Fitment of new rear panels
Panels are just held on with clamps right now. Many features here require alignment to come together simultaneously before any welding can begin.
Monday, October 21, 2019
Untold car history
As I started the process of stripping paint from the fenders, I paused
for a moment to study the many layers of paint that were revealed. I
know very little of this car's history, but the layers told an
interesting history. I found evidence of at least 4 repaints, and 2 collision repairs in the
same area. And, no surprise, more poorly executed repairs.
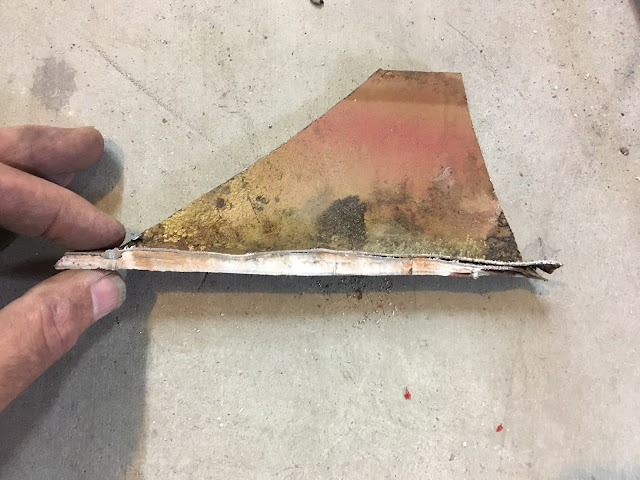
In these layers it can be seen that a collision was banged out, filled with a greenish bondo, and repainted in the original harvest gold. Then another layer of pinkish bondo sits on top of that, and the car was repainted again with a thin coat of harvest gold. Sometime later, the car was painted red. Then finally, there's a light coat of gray primer an another thin coat of red! This last coat of red must have been the cheapest of resprays, as it is super thin.
I also discovered that some of the green body filler had never hardened completely. It was soft and still smelled like resin in places, and a layer of it peeled away with a fingernail. Was this a possible reason for the second larer of pink bondo and second repaint? Or was it a second collision?
Sometimes a ham-fisted body repair causes more damage than it fixes. This fender must have been attacked with random blows from a big hammer until it was beaten back far enough to support the thick layer of bondo that would hide the 'handiwork'. So now I get to fix the damage inflicted by the former zealous hammer-wielder. First step is to grind out the bondo from the divots.
After about an hour of dolly-work it's getting smooth enough to start correcting the overall contours. The wheel arch is another story. Might have to use a puller on that. At least it wasn't rust under there.
Sunday, October 20, 2019
Rear end exposure
Got all the damaged rear sheet metal out. Now for cleaning up and fettling of the attaching points.
Restored the shape on the outer side of the 'point' below the tail light
which had been crumpled in. Got it pretty close with hammer and dolly.
Inner side of this will be new sheet metal.
Former repair had just sculpted the shape from bondo with no effort to hammer the metal back.
Filler on the side of the fender will be removed and proper dent repair done as well.
Friday, October 18, 2019
Heavy metal
The outside fender seams and welds were filled with lead at the factory in those days. They stopped this practice a few years later as it endangered workers' health.
I don't want to be sanding this stuff, and especially not welding around it. So I melted it out with a propane torch, wiping the bodywork with a paper towel while hot to get most of the residue off. Even still, I use a good filter mask while doing all this work, and sweep up and vacuum right away so it's not lingering in the shop.
The chopping begins
The Bondo was so thick everywhere that there's no way it could be removed. I couldn't find the panel welds so I just began cutting out chunks near the seams and joins. This will leave only small areas of bondo to grind out to locate the spot welds.
Free standing bondo. Not even touching the metal.
Underneath. It's like archaeology
-
Cleaned away the rust from the rocker with a wire wheel, and it revealed some rust through. So this would be cut out and patched. Inner ...
-
Repair work to the right-hand side dogleg was virtually the same as the left-hand side. Inside rocker looked much the same as the other si...
-
Before fitting the new replacement panel, the attachment surfaces on the wing need to be cleaned up and prepared for welding. But there ...