Sunday, October 27, 2019

Details


There are always a lot of little things that need to get done before you can go on to the big things.
This tail light mounting panel had a section cut out for some reason. So I patched it in with new metal. Traced the pattern from the other side of car. 


The muffler hanger mounting bracket at the rear of the boot floor had been torn off, leaving cracks and bits of the old bracket behind. The owner just drilled a hole in the floor and attached to that instead. After repairs to the boot floor a new bracket was made and welded in.  


Making up new bottom 'fillers' for the area under the tailfin points. Old pieces used as patterns. 


Oh no! I made two left-handed pieces! That caused me to do a double-take for a moment.


Test fitting. When this gets welded in the parts need to be assembled in a specific sequence. 


Thursday, October 24, 2019

Fitment of new rear panels

Panels are just held on with clamps right now. Many features here require alignment to come together simultaneously before any welding can begin. 


Monday, October 21, 2019

Untold car history


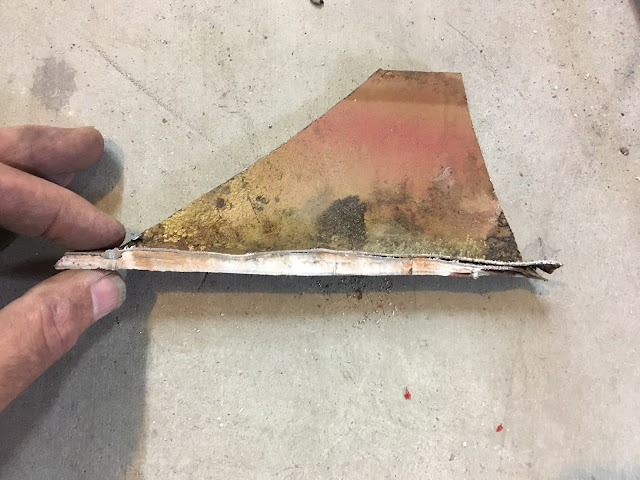
As I started the process of stripping paint from the fenders, I paused for a moment to study the many layers of paint that were revealed. I know very little of this car's history, but the layers told an interesting history.  I found evidence of at least 4 repaints, and 2 collision repairs in the same area. And, no surprise, more poorly executed repairs. 


In these layers it can be seen that a collision was banged out, filled with a greenish bondo, and repainted in the original harvest gold. Then another layer of pinkish bondo sits on top of that, and the car was repainted again with a thin coat of harvest gold. Sometime later, the car was painted red. Then finally, there's a light coat of gray primer an another thin coat of red! This last coat of red must have been the cheapest of resprays, as it is super thin.


I also discovered that some of the green body filler had never hardened completely. It was soft and still smelled like resin in places, and a layer of it peeled away with a fingernail. Was this a possible reason for the second larer of pink bondo and second repaint? Or was it a second collision?

Sometimes a ham-fisted body repair causes more damage than it fixes. This fender must have been attacked with random blows from a big hammer until it was beaten back far enough to support the thick layer of bondo that would hide the 'handiwork'. So now I get to fix the damage inflicted by the former zealous hammer-wielder. First step is to grind out the bondo from the divots.  


After about an hour of dolly-work it's getting smooth enough to start correcting the overall contours. The wheel arch is another story. Might have to use a puller on that. At least it wasn't rust under there.

Sunday, October 20, 2019

Rear end exposure

Got all the damaged rear sheet metal out. Now for cleaning up and fettling of the attaching points. 


Restored the shape on the outer side of the 'point' below the tail light which had been crumpled in. Got it pretty close with hammer and dolly. Inner side of this will be new sheet metal.
Former repair had just sculpted the shape from bondo with no effort to hammer the metal back. 


Filler on the side of the fender will be removed and proper dent repair done as well.

Friday, October 18, 2019

Heavy metal

The outside fender seams and welds were filled with lead at the factory in those days. They stopped this practice a few years later as it endangered workers' health.


I don't want to be sanding this stuff, and especially not welding around it. So I melted it out with a propane torch, wiping the bodywork with a paper towel while hot to get most of the residue off. Even still, I use a good filter mask while doing all this work, and sweep up and vacuum right away so it's not lingering in the shop.

The chopping begins

The Bondo was so thick everywhere that there's no way it could be removed. I couldn't find the panel welds so I just began cutting out chunks near the seams and joins. This will leave only small areas of bondo to grind out to locate the spot welds. 


Free standing bondo. Not even touching the metal.


Underneath. It's like archaeology


Thursday, October 10, 2019

Rear wing repair sections

Got a pair of rear wing repair sections from BMH. These aren't normally sold by themselves - they are an individual component in the complete rear-wing assembly.  Since I didn't want to replace the entire wings,  I persuaded a nice fellow at British Motor Heritage to send me out a pair of just these stampings for a very reasonable price. 

Now it's time to start cutting out some bodywork...